How to mod Dragon Age Origins
If you are anywhere within the gaming community, you have probably heard, seen, or played the newest release of the Dragon Age game, Dragon Age: The Veilguard. When they first announced this game, I remember being so excited to play it but also incredibly determined to play the previous three games that came before it. I wanted to know all the lore, characters, and stories coming into Veilguard.
Dragon Age Origin is the first game in the series and was released in 2009 and while it’s a terrific game and one of my absolute favorites, it’s not without its bugs and hiccups. That being said, because of how old this game is, it’s virtually impossible to play unmodded, whether you just want to improve the appearance, restore some story dialogue, or fix the game crashes, if you’re going to play Origins, you will need to mod it.
When I first started diving into Origins, I found that there was no in-depth comprehensive guide for how to properly mod the game from start to finish which is where this little post comes in. This post is meant to help guide you through the process of modding from start to finish as a complete beginner. Now, without further ado, let’s jump into the tutorial!
quick navigation
1. Create your override folder
Before you start doing any heavy lifting with mods and downloading, you will first need to give your mods a home. We are going to do this by creating a folder called override and placing it in your Dragon Age pathway within your documents. Here is what the folder address should look like:
C:\Users\[USERNAME]\Documents\BioWare\Dragon Age\packages\core\override
Please make sure that you are pinning this folder to your quick access so you can easily find it in the future!

2. Install 7zip and chargenmorph compiler
With your override folder created, we need to download 7zip and the Chargenmorph compiler:
7zip is an alternative software to extracting zipped folders. Even if you have a computer that will extract zipped folders for you, you still need to use 7zip as some of the mods on Nexus will require it due to some files getting lost or not unzipping properly with just the Windows extractor. So trust me and head over to 7zip’s download page and download the proper software for your computer.
Next, you’re going to need to download the chargenmorph compiler from Nexus. This is used for any kind of appearance mods you might want to use such as hair, skin, makeup, etc. With Dragon Age Origins (and Dragon Age 2), each appearance mod will come with a chargenmorph file with the coding for it but your game can only use one, this chargenmorph compiler will take all of those files and, you guessed it, morph it into one giant file.
Once you have downloaded the Chargenmorph compiler, I highly recommend adding the folder to a place where it is easily accessible and pinning it to your quick access bar as you will be using it frequently! I added mine to my main Dragon Age folder:

3. Find and track your mods on Nexus
Now before you start getting crazy and adding 500+ mods to your game, start slow. I know that’s easier said than done but if you add too many mods when you are first starting, it makes it very difficult to troubleshoot if anything goes wrong. So start slow and test the waters before diving right in.
When it comes to finding mods, your number one place is going to be Nexus Mods. Because Dragon Age is an older game, I would recommend sticking with a trusted source and downloading them all from Nexus.
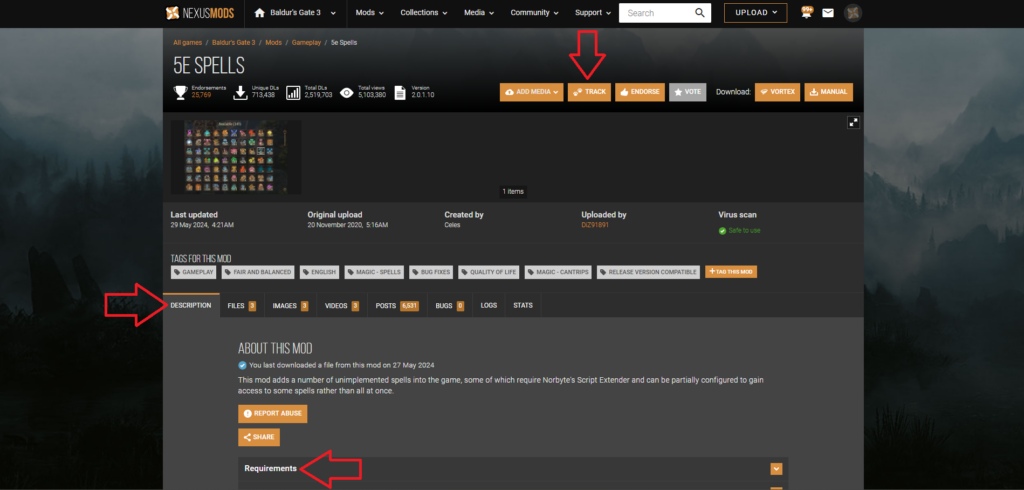
On the Nexus website, I highly recommend making an account. Once you’ve done that and you’re logged in, start finding mods that you want in your game. I recommend starting with 2-3 mods to start with. Once you’ve found the mod you want to download, there are a couple of things you’re going to need to do.
- Read the details & posts. DON’T SKIP THIS PART. I know it’s tempting to just blaze through and start downloading but the creators of the mods often put very important information within the details so make sure you read through it thoroughly. Creators will often leave important updates as a pinned post at the top of the Posts section. You can tell it’s from the creator if the post is outlined in red!
- Check the Required section. Also, a part that should not be skipped! Often mods depend on other mods so it’s important to know that you have all the correct mods downloaded otherwise they won’t work in the game.
- Track the mod. If you are trying to download a mod it’s very important to track it because you will want to have a way to easily access all of your mods in the future if you ever need to revisit them.
4. Memory fixes
Before we jump into actually installing any mods, we first need to fix a memory leak so that your game doesn’t crash, freeze, or lag. These memory leaks can happen when using too many custom scripts or graphic mods so when we need to add a memory patch. This is a bit of a process but it is mandatory if you want your game to run properly without crashing, lagging, or freezing every two seconds.
If your Dragon Age Origins game is downloaded through Steam, you need to download an alternate daorigins.exe file from Nexus and a memory patch from NTCore. Download both of these and unzip them:
Backup your daorigins.exe file
First, locate your bin_ship folder. You should find it within this file path:
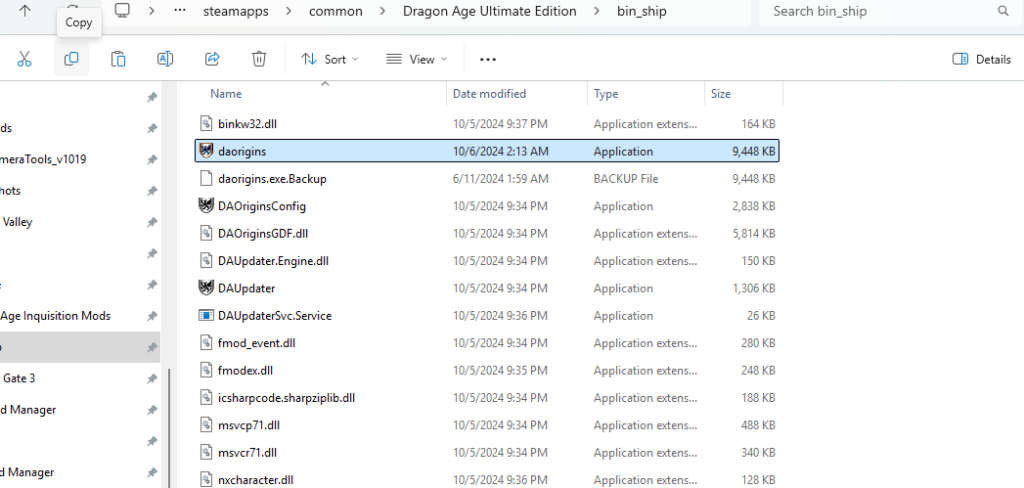
C:\Program Files (x86)\Steam\steamapps\common\Dragon Age Ultimate Edition\bin_ship
Within your bin_ship folder, you will find the daorigins.exe file. Right click and press copy, then paste that copied file into another folder as a backup. It doesn’t matter where you add it, just that you add it to another folder where you will remember where it is. I put mine in my documents folder.
Replace the daorigins.exe file
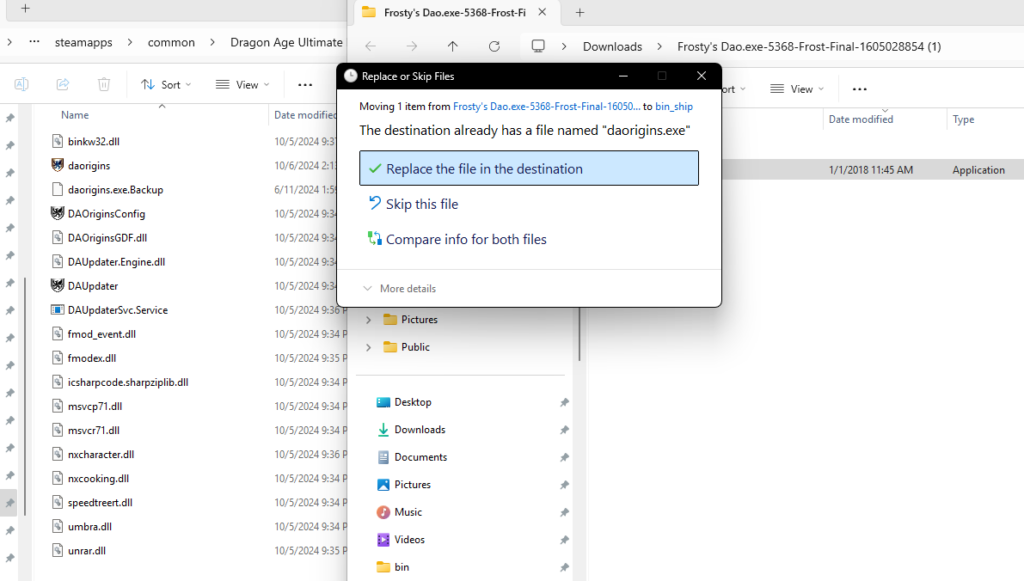
Replace with the one you downloaded from Nexus Mods. When you add the Nexus Mods version into your bin_ship folder, if you get a prompt asking you if you want to replace the file, click yes.
Run the memory patch
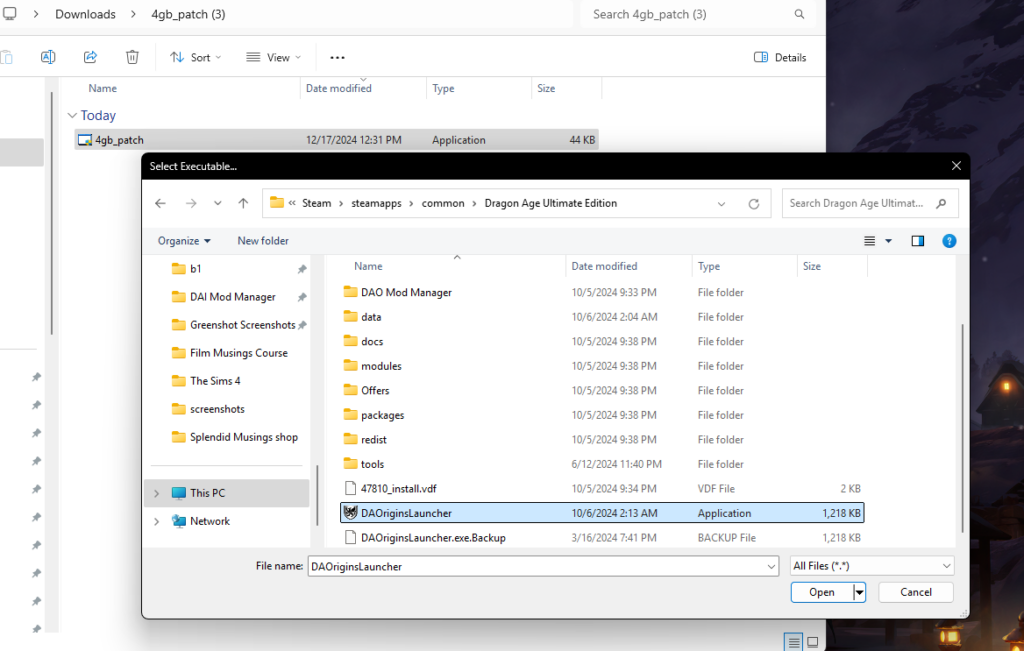
Once you’ve extracted the memory patch from NTCore, open the 4gb_patch file and locate the daorigins.exe file that you just replaced. Double-click the daorigins.exe file and wait for the success popup to show.
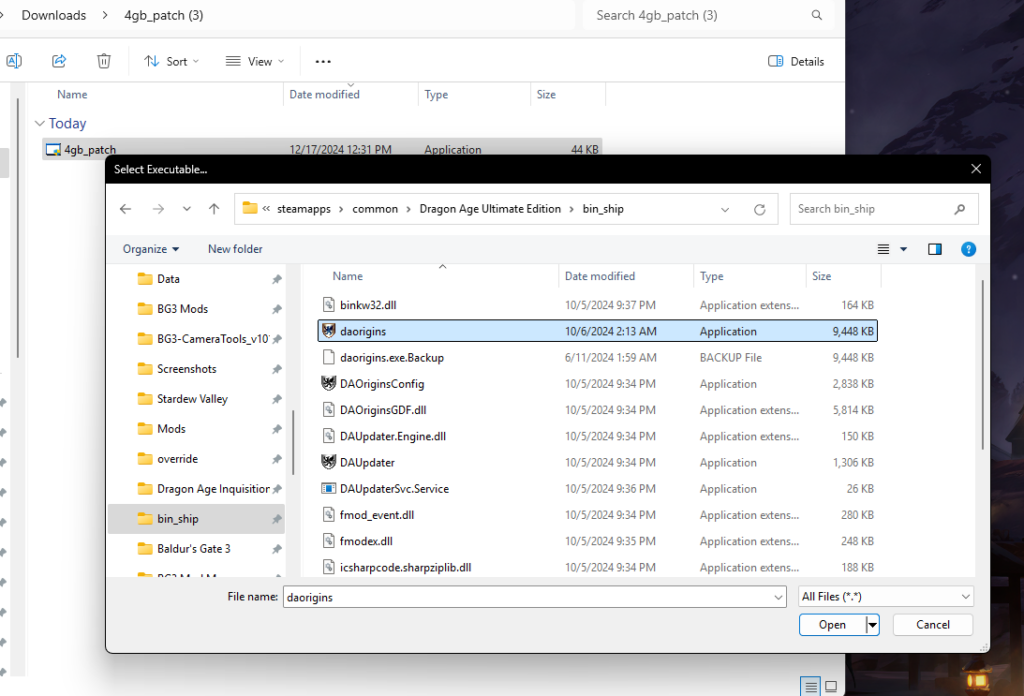

Now, do this same process but for the DAOriginsLauncher.exe within the Dragon Age Ultimate Edition folder:
C:\Program Files (x86)\Steam\steamapps\common\Dragon Age Ultimate Edition

Configure your game options
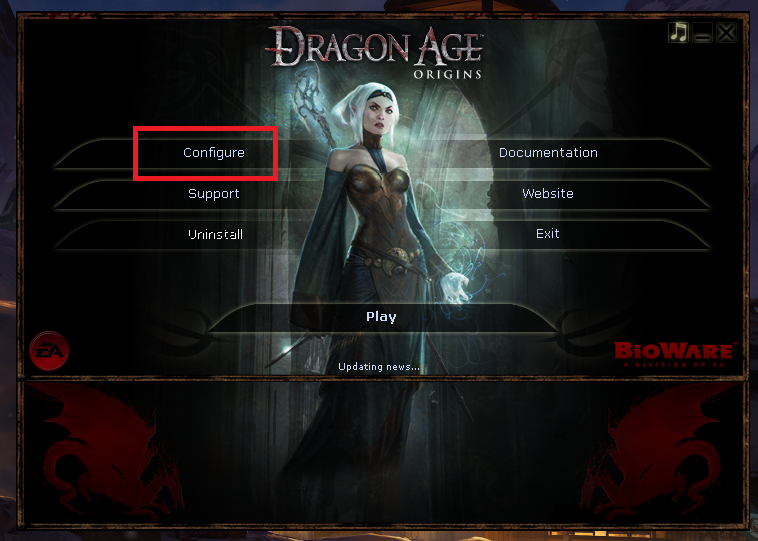
Open your game and in the DAO launcher, press the ‘configure’ button on the top left. This will bring up the Dragon Age Origins Configuration Utility window.
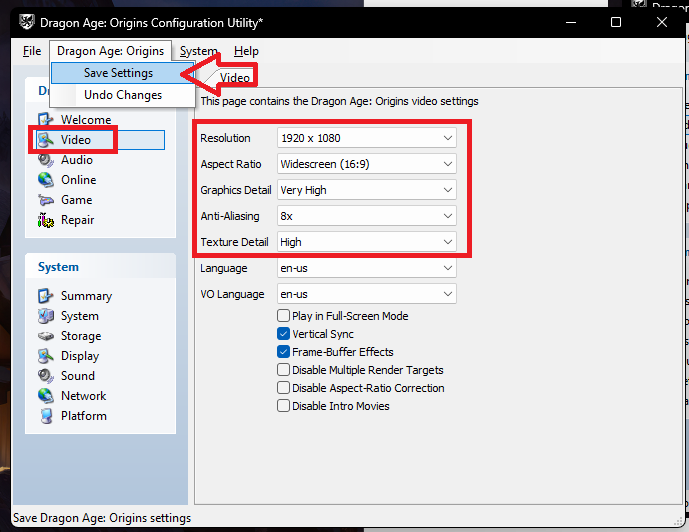
From here, go into the video section on the left-hand side and set everything to the max settings according to your resolution.
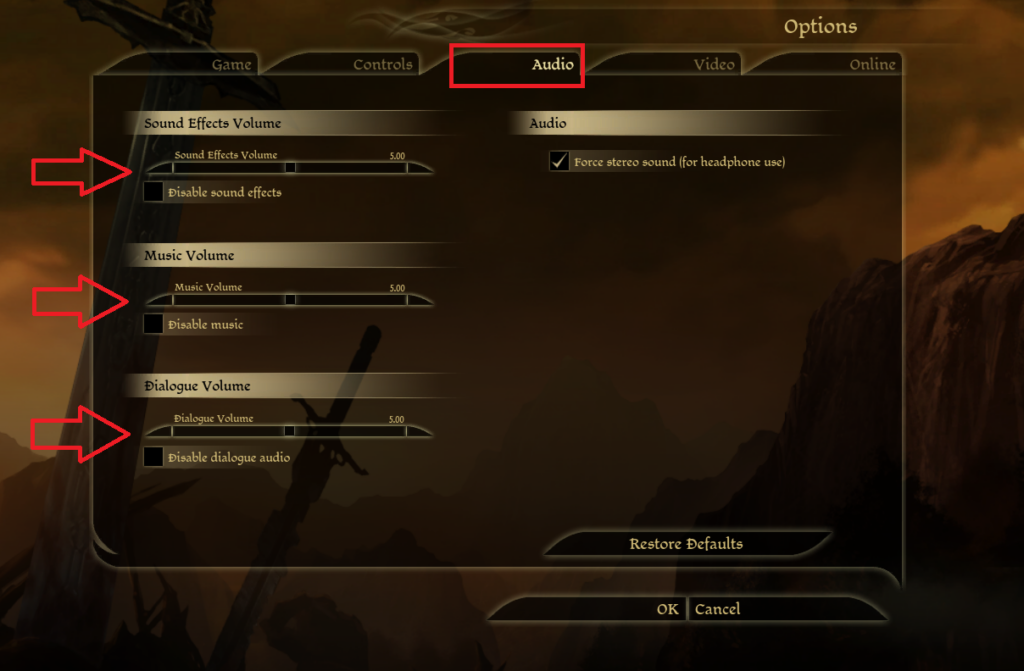
Adjust the game volume
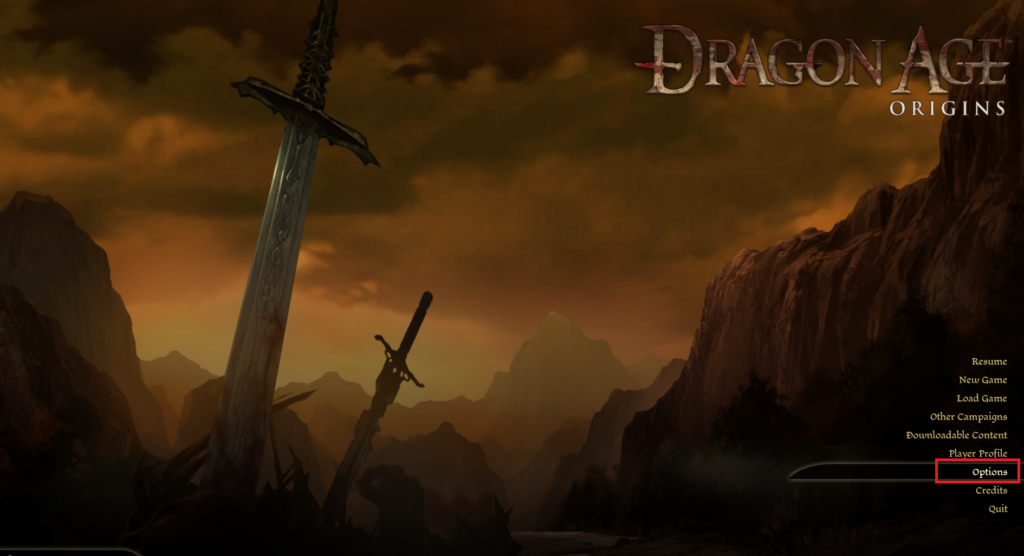
Loading up the game, click ‘options’ on the main menu, and then go into the audio tab to lower the sound effect and music volume sliders. I typically keep mine around 5-6.
Run DAO updaters
Make sure your game is closed and find the redist folder within the main Dragon Age Ultimate Edition folder. This is the file path:
C:\Program Files (x86)\Steam\steamapps\common\Dragon Age Ultimate Edition

Run both updaters that are within this folder to unlock the DLCs within the game:
- DAOU_UpdateAddinsXML_Steam
- DAUServiceSetup_Steam


And there you have it, your game’s memory should be completely fixed! You should be able to test this out when you are within the character creator and you are messing around as this is usually when a lot of game crashes will happen without the memory fix.
Tip! If you are finding that despite doing all of these steps, your game is still freezing and crashing when you enter the city of Denerim, LOWER YOUR GRAPHICS! It shouldn’t make too much of a difference visually but it will clear some of the memory when it comes to doing quests in Denerim since it’s a much bigger map that takes a lot more memory!
5. Download and install your mods
Now here comes the fun part, downloading your mods! There are a few foundational mods that I would highly recommend downloading but for the most part, every Dragon Age Origins mod comes in two different formats, either a DAZip file or an Override folder file. Let’s break down each one and talk about how to install them:
DAZip
DAZip files are fairly easy to install within the game, you just need to know where to find the updater. Within your folders, you’ll want to head to this file path:
C:\Program Files (x86)\Steam\steamapps\common\Dragon Age Ultimate Edition\bin_ship
Alternatively, you can always go into Steam, and right-click on Dragon Age Origins > Manage > Browse Local Files to pull this pathway up. Once you have found the bin_ship folder, pin it to your quick access tab! You will need it for later!
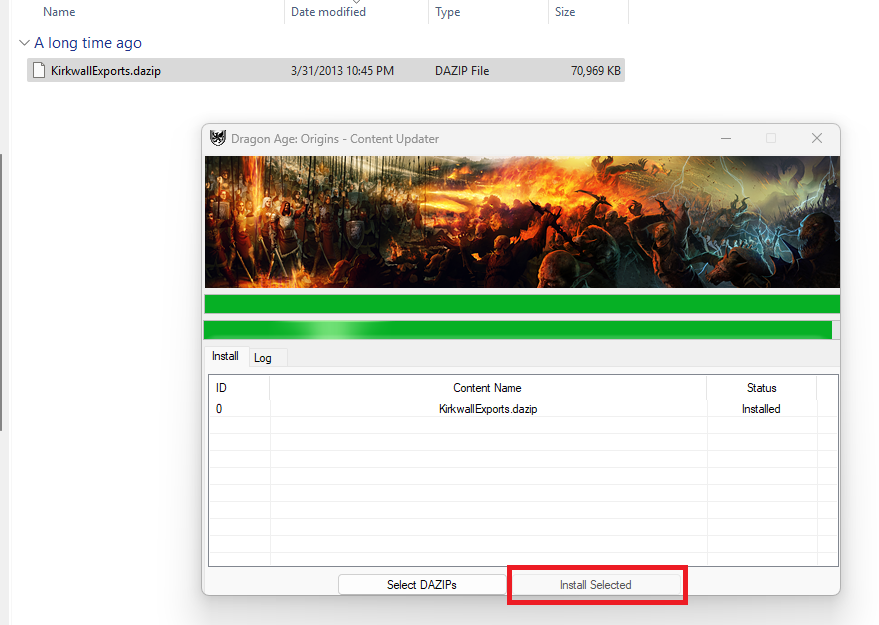
In your bin_ship folder, you should have a file called DAUpdater, open this up and you will see a pop-up that looks like this:

Now, all you have to do is drag your DAZip file, drop it into the pop-up window, highlight the selected mod, and click install. Once the mod says ‘Installed’ you are good to go!
To check if a DAZip file has been properly installed, you will want to load up your game and head into the main menu. On the main menu, click ‘Downloaded Content’ and then view the ‘Installed Content’ tab. Scroll down and within this list, you should find the mod that you downloaded! This is also where you can uncheck the mod if you don’t want it in your game.
If you happen to run into an issue where you want to remove the actual DAZip file from your game completely and you don’t want it in your list at all, you need to head into your AddIns folder within your game files to find it:
C:\Users\[USERNAME]\Documents\BioWare\Dragon Age\AddIns
Once you are in your AddIns, you should be able to see each DAZip mods folder. Just locate the one you want to remove, highlight it, and click delete. Now it’s removed from your game completely!

Override
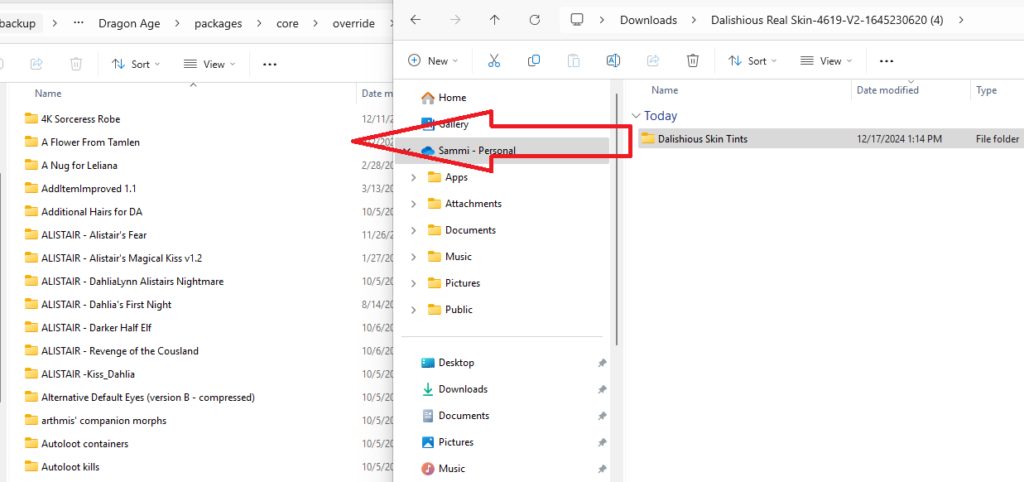
Remember that override folder we created at the beginning of this tutorial? Well, that’s exactly where these mods go! And the best part, all you have to do is download from Nexus, unzip, and drag and drop. And that’s it! Pretty easy huh?
In order to delete a mod from your override folder, it is just as easy. Just highlight the mod or folder and hit delete and it will remove the mod from your game completely!
6. Compile your Chargenmorph files
Now that you’ve downloaded a few mods, especially any appearance mods, you will need to run the Chargenmorph compiler in order to combine all the Chargen files that came with each of your mods.
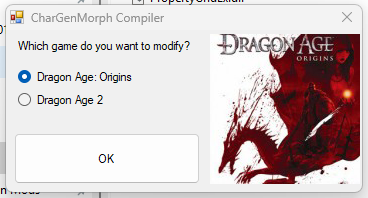
Head into the folder that has your Chargenmorph compiler and load up the software. Once loaded, you should get a pop-up that lets you choose which game you are compiling for, you’ll want to choose Dragon Age Origins.
If it’s the first time you’ve ever opened the game, you will need to set the Chargenmorph compiler to the correct game path so it knows what folders to look through when scanning.

Once you have your game path set, your compiler should look something similar to this:
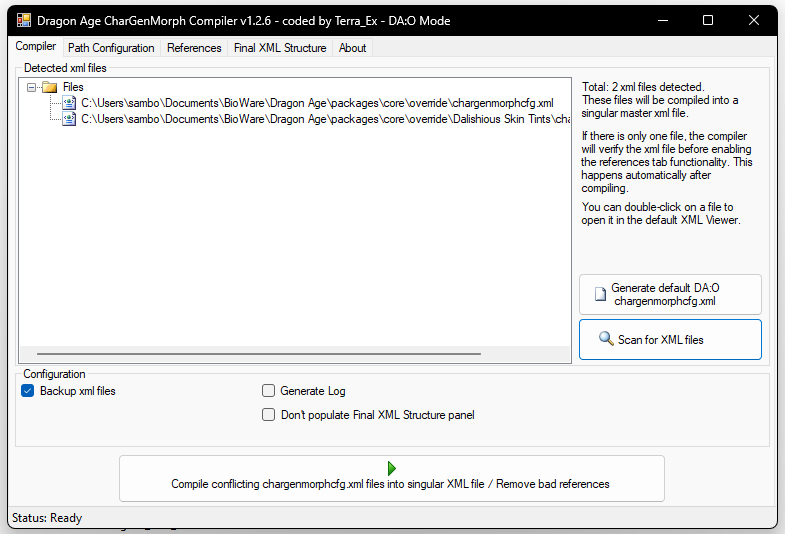
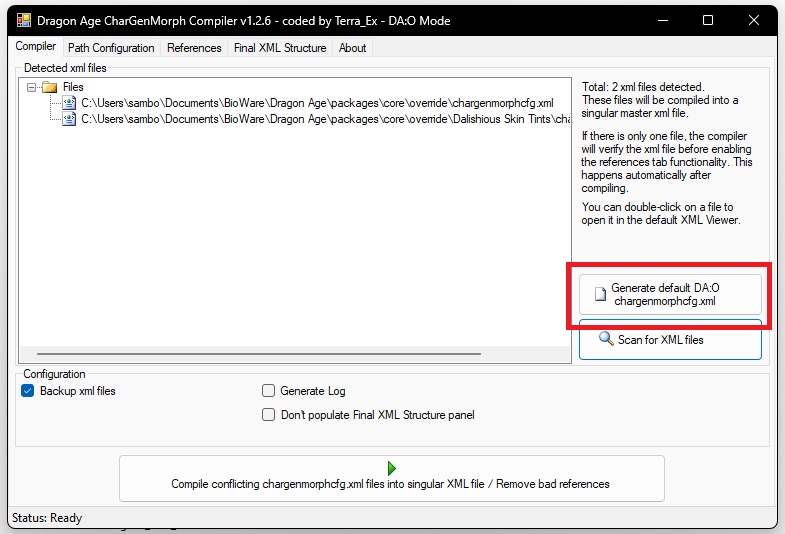
If this is your first time using the compiler, I highly recommend having the software create a brand new Chargenmorph file for you. This will be your main file that everything will be compiled into. You can do this by clicking the ‘Generate default DA:O chargenmorphcfg.xml’ button.
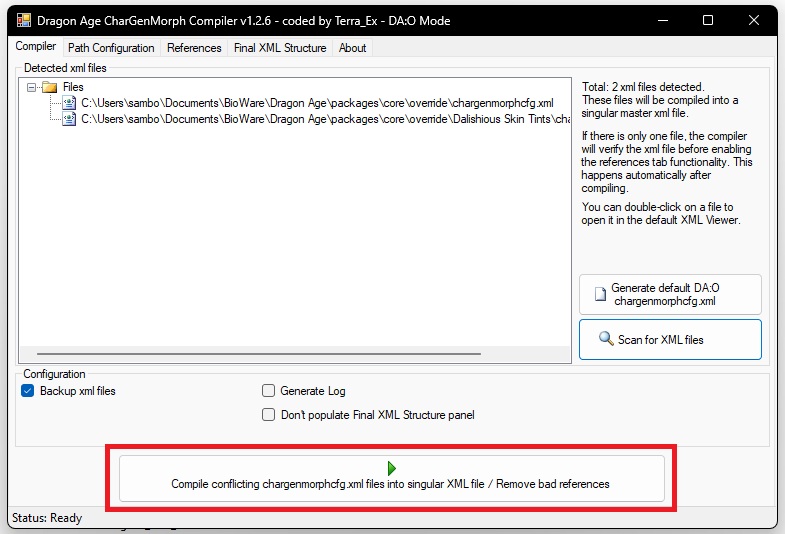
The steps above only need to be done once, every time after that you will just load up the compiler and should immediately see a screen with a list of all the Chargenmorph files from the mods you have added to your override folder. To compile them, you will want to press the ‘Compile conflicting chargenmorphcfg.xml files into singular XML file / Remove bad references‘ button at the bottom.
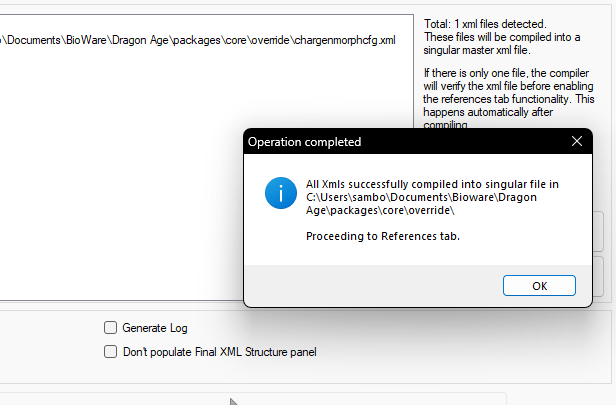
This will then automatically do everything for you! Once it’s finished, you might get a pop-up that with then take you to the References tab. From here you can click the ok button and you’ll get a screen that will look something similar to this:
At this point, you will want to scan all your files for any possible bad references that could mess up your game. To do this, you just need to click the ‘Remove bad references from chargenmorph.xml file’ button at the bottom. Click yes when it asks if you want to remove the bad references.
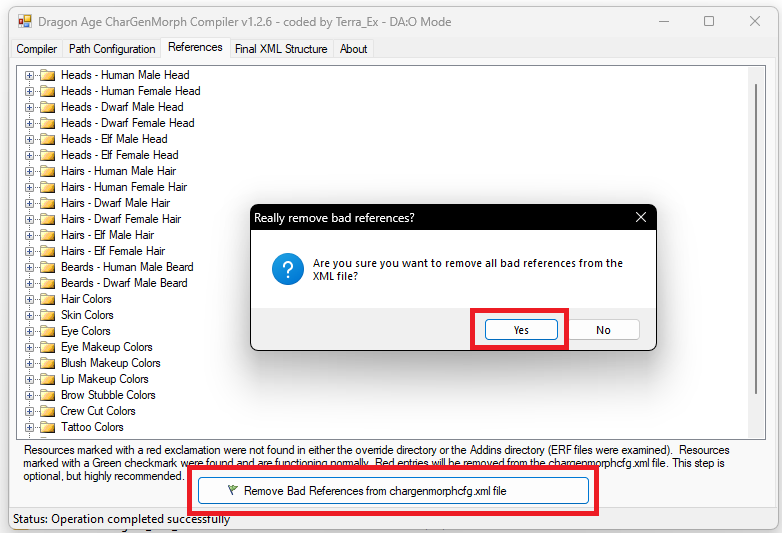
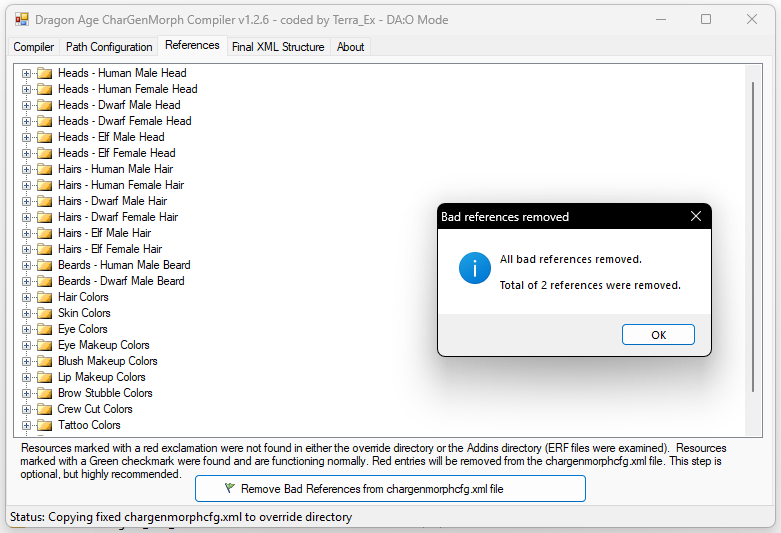
If there were any bad references, you’ll get another popup afterward, just click the ok button once again and viola, you’re all done! All of your chargenmorph files have been combined and should show up in the game successfully now!
7. Install the console commands
This step is optional but I highly recommend it! To add certain outfits and cheating mods to the game, you need to install the console. First step is to download the Make CONSOLE commands visible mods from Nexus:
Once you have downloaded and extracted that mod, you need to drag the fonts.erf file into your data folder. If it asks you to replace a previous file, click yes. You can find the data folder here:
C:\Users\[USERNAME]\Documents\BioWare\Dragon Age\packages\core\data
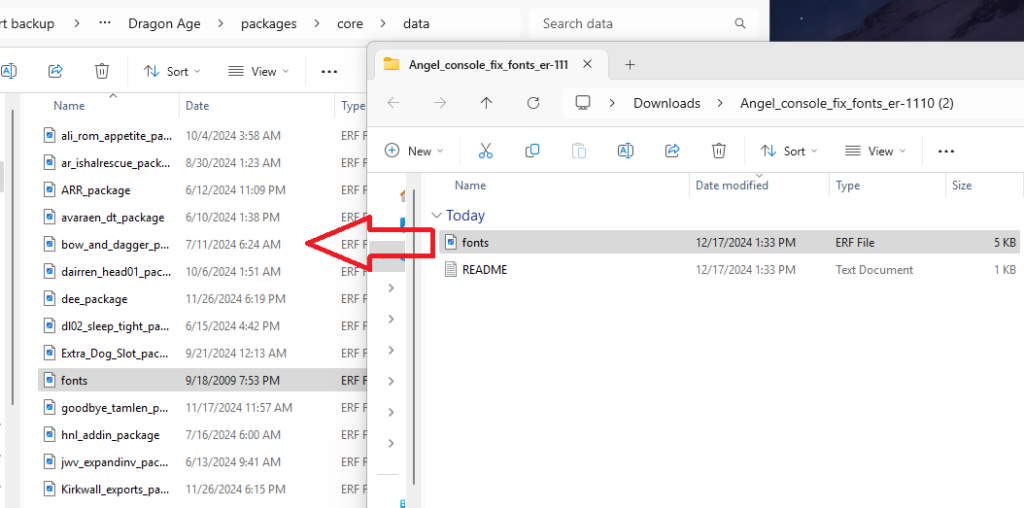
Once you have updated or added the fonts.erf file into your data folder, you have to edit the DragonageOriginsLauncher.xml. You can find that file via this pathway:
C:\Program Files (x86)\Steam\steamapps\common\Dragon Age Ultimate Edition\data
Once you find the DAOriginsLauncher file, open it up in a notepad and look for this line:
true action=”execute” file=”${BINARIES_DIR}\DAOrigins.exe” path=”${BINARIES_DIR}” autoquit=”true”
If you need to, press CTRL + F and paste the above code to easily find it!
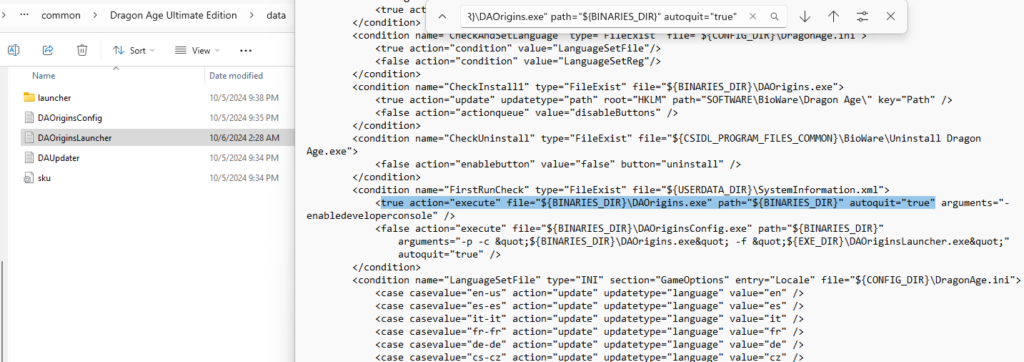
Add: arguments=”-enabledeveloperconsole” at the end of “true” but before the >
(New line will be: true action=”execute” file=”${BINARIES_DIR}\DAOrigins.exe” path=”${BINARIES_DIR}” autoquit=”true” arguments=”-enabledeveloperconsole”)
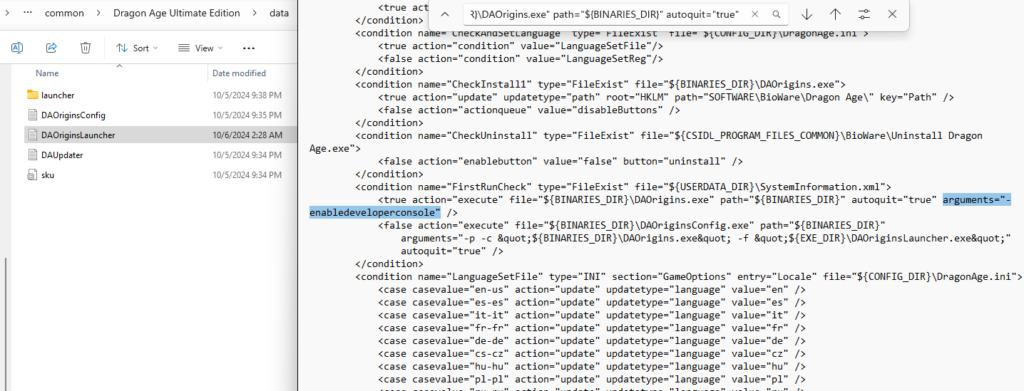
Click ‘File > save’ and close the notepad.
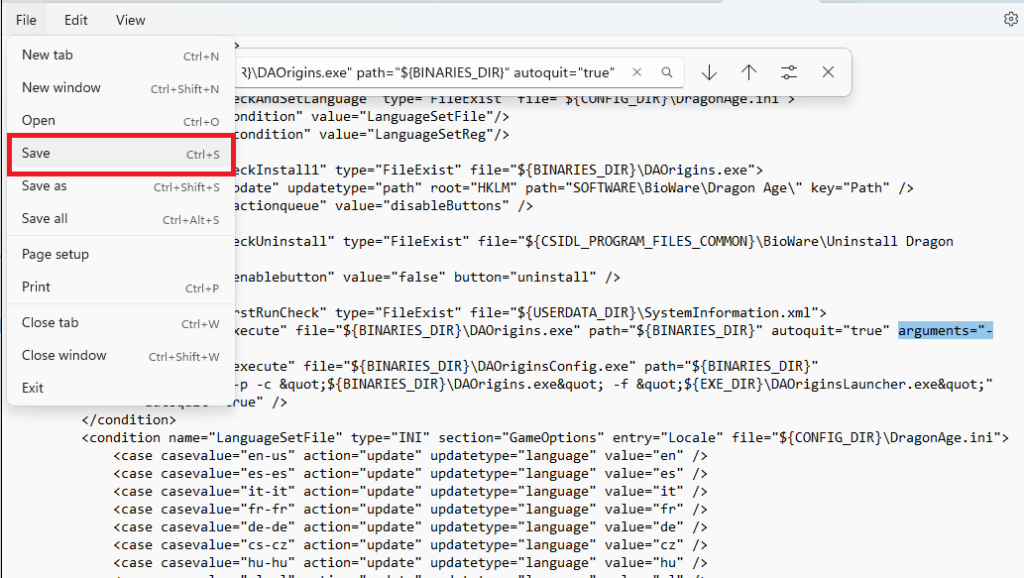
With that small bit of coding added and the mod in your game, you can check to see if Console commands work!
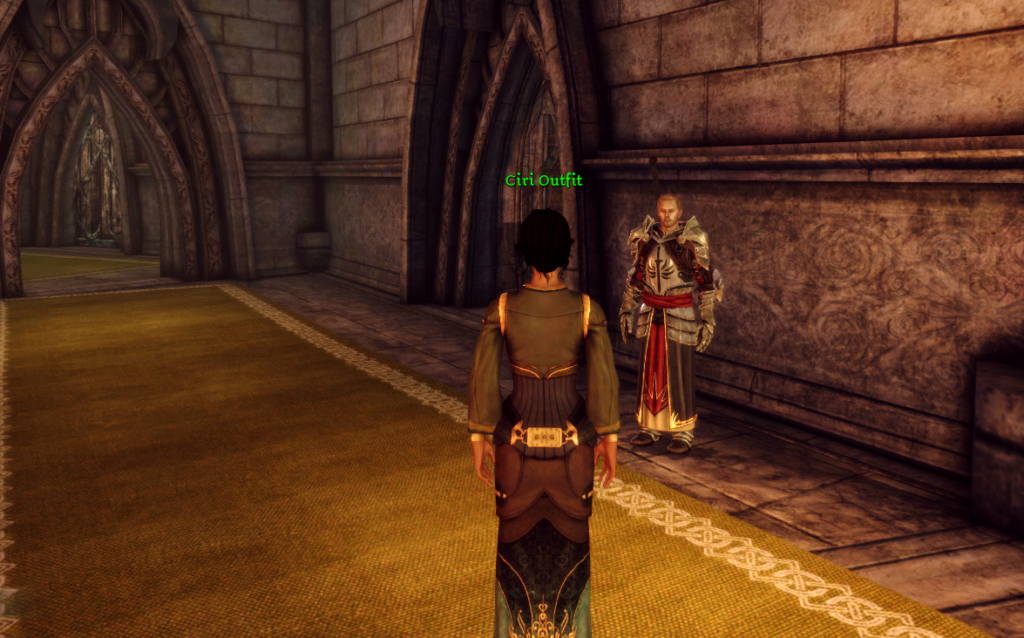
Load up your game and go into a previous save. Once in your save, press the tilde key ‘~’ and you should see a little white ‘>’ pop up in the corner. This is where you will put in your commands! So say for example you downloaded the Witcher Apparel mod, you would type in ‘runscript tw3_ciri’ and then press enter. If it worked you should see a bright green text pop-up above your character’s head!

And there you have it, friends! Your Dragon Age Origins game is officially ready to be modded and played. I hope this guide was helpful and don’t forget to check out my other tutorial posts if you want help with modding other games.
Sources
This tutorial wouldn’t have been possible without the help of these amazing creators and videos:
How to Install Mods in Dragon Age Origins by Food then Games
Mod Installation and Toolset Tutorial by IAKR
Complete Dragon Age Origins Modding Guide + Mod List by Just Call Me Frosty